The Open Workshop Table: Why Shared Materials Make Starting Easier
An open workshop table makes shared materials easier to choose and reach, helping a group begin making together without waiting for instructions.
How do you help a group begin making together without asking everyone to wait for an idea? An open workshop table can make the first move easier: put shared materials in view and within reach, then leave room for people to choose what catches their attention. The arrangement does not decide what anyone should make. It simply makes starting feel possible.
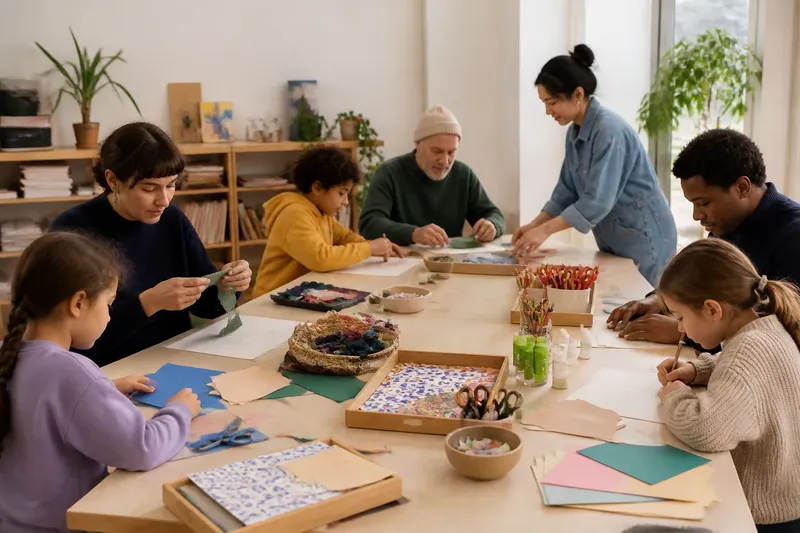
Imagine a neighbourhood art room hosting an invented, hypothetical collage session for a mixed group of adults and children. The organiser has paper, fabric scraps, coloured pencils, glue sticks and blunt-ended scissors. At first, everything is packed into shopping bags beneath the table. People arrive, take seats and glance towards the organiser, unsure whether they should wait for a demonstration.
In this imagined session, the organiser puts a modest selection of materials on the table, groups similar things together and keeps the middle clear. A child reaches for blue paper; an adult picks up a fabric scrap and compares its texture with a pencil line. Before anyone has been given a theme, the group has begun. The observable result is not a set of finished pictures, but hands moving and small conversations forming around actual materials.
Make choices visible
Choosing a first action can be surprisingly demanding when a room offers only a blank sheet and the broad instruction to “make something”. A person may be trying to work out what is allowed, what materials are available and whether their idea is suitable, all at once. Putting a few options where everyone can see them removes one of those uncertainties: people can respond to a colour, shape or texture instead of inventing a plan from nothing.
Visibility matters more than abundance. A table crowded with every possible tool can feel like another puzzle: which things belong together, what is safe to pick up, and where can a project fit? A carefully chosen spread lets people scan the options quickly. A short selection of contrasting papers, a dish of pencils and a basket of fabric may offer more useful invitations than a heap in which every material is buried.
Think of the table like a well-laid kitchen counter. If the chopping board, bowl and ingredients are in sight, you can begin with the part that feels natural rather than opening every cupboard first. For a group making session, the materials are the invitation; they need not prescribe a recipe.
Arrange a welcoming table
Before people arrive, ask what the first few moments should feel like. A welcoming table says, through its layout, “You may look, choose and begin.” It does not need a formal display or elaborate labels. It does need to make the materials legible and the act of reaching for them socially comfortable.
- Choose a small, varied selection. Set out a few distinct materials, such as plain and patterned paper, soft fabric offcuts, coloured pencils and glue sticks. Variety gives people different ways in without turning the table into storage.
- Group materials by what they are. Place pencils together in a jar, paper in a shallow tray and fabric in a low basket. Clear groupings help newcomers locate something without asking for permission or hunting through a mixed pile.
- Keep the first reach easy. Put the most approachable materials along the edges, where seated people can reach them without leaning across someone else’s work. Leave shared tools where more than one person can get to them comfortably.
- Leave a clear working patch. Keep some table surface open for sketching, sorting or simply resting a hand. If every inch is occupied, people have to move things before they can begin.
- Make the choices understandable. If two types of paper serve different purposes, a brief spoken note or plain label can clarify the difference. Avoid a long list of rules that makes touching anything feel like a test.
- Give used materials a visible home. A spare tray for offcuts or a basket for items to return helps people share without worrying about keeping everything perfectly organised as they work.
The layout should suit the people in the room, not an idealised image of a workshop. A table used by young children may benefit from fewer materials at a time and tools placed where an adult can supervise. A group with different mobility needs may find a low, open basket easier to use than a deep container. Adapt the arrangement to the materials’ labels, the maker’s instructions and any local rules that apply; for concerns about an individual participant’s access or safety, seek advice from a suitably qualified professional.
Let the first action stay small
A first action need not announce a complete project. It could be laying two papers side by side, folding a scrap, making a pencil mark or sorting colours into a loose cluster. These small moves are useful because they let a participant learn what a material feels like before deciding where the work is going.
In the imagined art room, the organiser does not begin by asking everyone to make a collage about a shared theme. Instead, they offer a simple opening: take a look, choose one thing, and see what it suggests. The adult with the fabric tests it against the paper; the child makes marks on a spare strip. Their starting points differ, but both are underway. The organiser can then offer help in response to what people are already doing, rather than guessing which instruction everyone needs.
That distinction also helps quieter participants. An invitation to take a material is easier to accept than a demand to explain an idea to the whole group. Someone can start privately, watch a neighbour’s approach, or ask a focused question about the glue or paper. Conversation can grow around choices people have made, rather than being required before anyone has had time to settle.
Keep the table shared
Shared materials work best when they feel available to the group rather than owned by the quickest person to reach them. The organiser can make that expectation gentle and visible: place common tools centrally, offer a second option when possible, and remind people that materials can be passed along after use. This is not about policing every pencil; it is about making access feel fair enough that nobody assumes the table is for someone else.
It helps to separate materials people can freely take from tools that need to be returned. A tray of paper scraps may be a take-and-use supply, while scissors go back into a cup after cutting. Say what the arrangement is in plain language. If participants are unsure whether an item is shared, they may avoid using it altogether.
There is no need to keep the display pristine once making begins. A few shifted baskets or paper layers can show that the table is in use. The useful distinction is between active materials and clutter that makes it hard to reach or see anything. If the supply becomes difficult to read, quietly restore the groupings or bring out a fresh selection rather than stopping the session for a full reset.
When does an open workshop table help?
What should go on a shared workshop table?
Choose materials that invite different kinds of first action, such as paper for arranging, pencils for marking and fabric for handling. Keep the selection relevant to the session and easy to distinguish, rather than laying out supplies simply because they are available.
How many materials should be visible?
There is no fixed number that suits every group. Start with a selection people can scan without searching, then bring out more if participants ask for them or their work naturally calls for them.
Should a facilitator demonstrate first?
A short demonstration can help when people need to understand how a tool works, but it need not be the only route into the activity. Showing where materials are and offering a simple first action can let people begin at their own pace.
What if nobody starts straight away?
Give the group a little time to look and settle, then make one small action visible yourself, such as sorting paper by colour. Offer a specific, low-pressure prompt—“Would you like a sheet to try a mark on?”—instead of repeating a broad instruction to create.
Read the room, not the objects
Materials can invite a start, but they cannot tell the organiser what each person needs. One participant may reach in immediately; another may prefer to watch, talk or wait until someone else has made a choice. Make room for those different rhythms. The table is an opening, not a demand that every person produce something at once.
In the hypothetical neighbourhood session, the organiser notices that a participant is hovering near the fabric basket. Rather than putting a piece into their hand, the organiser moves the basket a little closer and says that the scraps are available to touch or use. The participant picks one up and sets it beside a paper shape. The helpful change is modest: the invitation is clearer, while the decision remains theirs.
Keep prompts tied to what is happening. “Would a larger sheet help?” responds to someone arranging small pieces; “There are more pencils in the jar” answers a practical question. Generic encouragement can be kind, but precise help is easier to act on. Equally, if someone is absorbed in their own direction, leave space rather than asking for an explanation that interrupts them.
Notice what the setup changes
When the session is winding down, consider the start rather than judging the work by how polished it looks. Were newcomers able to see what they could use? Did anyone have to wait for the organiser simply to locate a material? Which items were ignored, and which prompted people to talk, compare or combine ideas? These observations can guide the next arrangement without turning a relaxed gathering into a performance review.
For the imagined art room, the organiser might notice that fabric scraps drew attention but the scissors were hard to reach from one side of the table. Next time, they could put the scissors in a more accessible shared spot and leave the fabric in its basket. That is a practical lesson from the invented scenario, not proof that one layout suits every group. The right arrangement is the one people can understand and use in that room.
An open workshop table is a quiet piece of facilitation. It makes possible actions easier to see, gives hands somewhere to begin and leaves the direction of the work with the people taking part. If you are setting up a shared materials table, begin with a small, visible selection, protect a patch of clear space and watch what participants reach for. The next useful adjustment may be as simple as moving one basket closer.